Hey, hey, hey pretty people! 🙂 I want you to meet my friend, Jenny! She is the face and diy-er behind The Domestic Wildflower! I LOVE what her blog is about (to grow like a wildflower!) and stands for. AND I think you will too. Today’s post is a DIY home decor project! I am not the biggest DIY-er BUT lucky for us, Jenny is! I was so excited about this project because I am a fellow crocheter (ok guys, you may now start the “grandma” jokes…but guess who will be laughing when my crocheted mermaid tail blanket is finished?) Read along to learn more about how you can make the most adorable crocheted basket.
Hey folks my name is Jenny and I blog about sewing, canning, and old-fashioned DIY at www.thedomesticwildflower.com and I wanted to share a super simple crochet project that you can whip up using giant felted yarn.
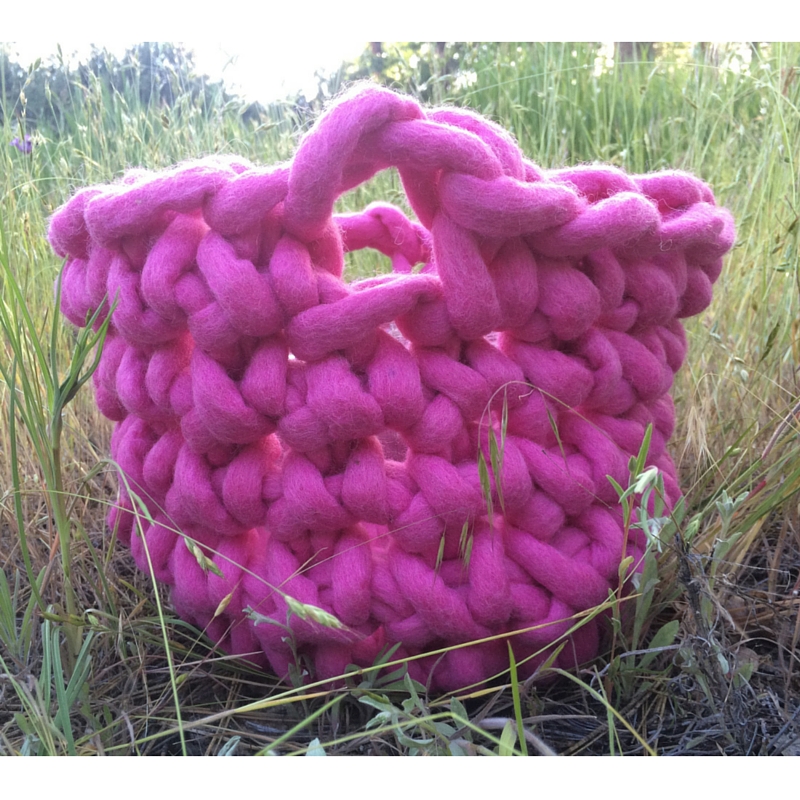 To say I am a fan of giant yarn is an understatement to be sure. I love the scale, the texture, the speed in which you can complete a project, the heft, the visual drama; all of it. I’ve been looking for something made in the USA that would be suitable to make a basket and I struck giant yarn gold with Love Fest Fibers. They have a felted giant yarn that is really, really tough and it is also aptly named: Tough Love.
After you score a ball of Tough Love, here’s what you do. You need knitting needles size 50 or a crochet hook size U, but I used my fingers and made my basket in about 1 hour and 45 minutes.
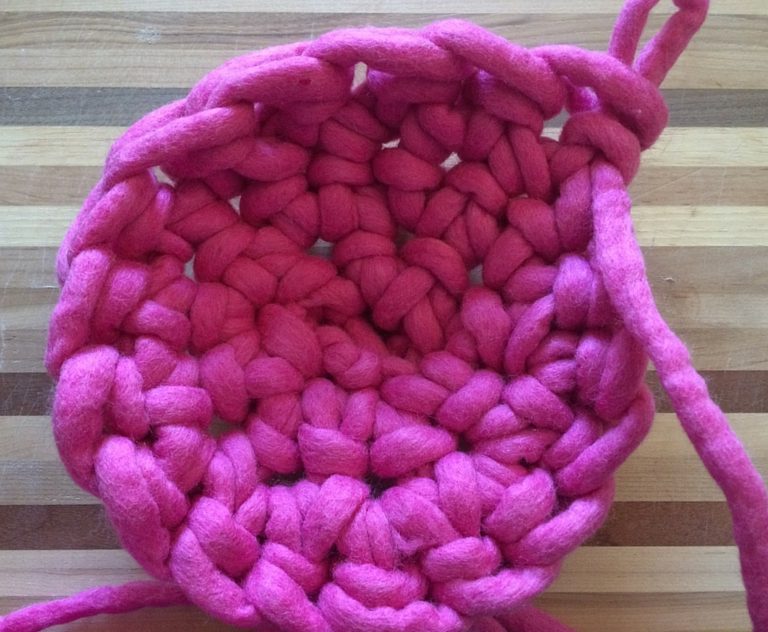
The process is very similar to crocheting a beanie in that you chain 3 or 4 (depending on if you use your fingers or a hook, and how big your loops are if you use your fingers) and slip stitch to connect them into a circle. Then, crochet 2 single crochets in each loop, all the way around, creating a flat, round base. I went around 4 times and then started to create the sides of the basket.

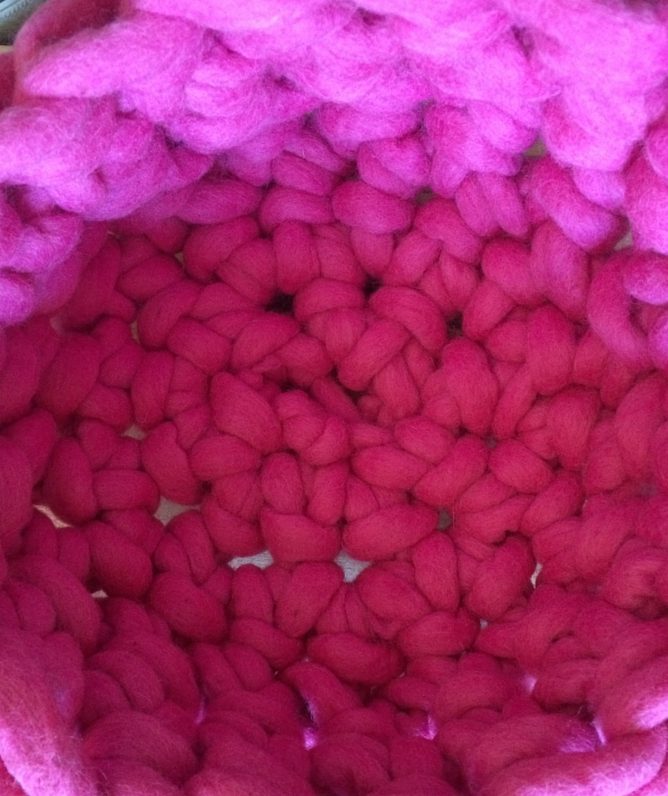
When your base is wide enough, (about 7-9 inches) start to make only 1 single crochet in each stitch. The sides will begin to form almost immediately and because you are working with such big yarn, you will be able to see right away that you are, indeed, doing it right. The sides will start to go up, rather than how the base went out, and you will continue crocheting a single crochet stitch into each loop as you work your way around. Each stitch is about 2 inches tall and wide so it works up really quickly. It is also very easy to see if you have made a mistake and easy to take stitches out if you need to.
When your basket is about as tall as it is wide, you are nearly done. I created handles by chaining once (rather than making my next stitch), skipping the loop where I would have built the next stitch, and then proceeding as normal. Because the yarn is so big, that’s all it took to make a handle big enough for my hand. Crochet halfway around the basket and repeat to make the second handle.
When you have 3+ feet left, you need to stop the single crochets and start to slip stitch as a way of decreasing and concluding your basket. That is the only tricky part of giant yarn; there’s not really a good way to stop without it looking abrupt and this slip stitch method seems to be the best. When you have about 6-8 inches left you can weave the ends back on itself and if you happen to have a felting needle (no worries if you don’t) you can just felt the ends in place.
Of course, you can make a wider base and the resulting sides will be shorter. A cat would LOVE to snuggle in something like this; I had to fill my basket with cloth diapers so my friendly feline wouldn’t make herself at home in it 🙂
I hope this tutorial was helpful and inspirational for you crafty beginners! If you loved this post, head to www.thedomesticwildflower.com for weekly posts sure to ignite your creativity and can-do spirit!
So what do you think? Did you LOVE Jenny’s post as much as I did? I hope you learned something new today and gained some amazing inspiration! As soon as I am done with my mermaid tail blanket, I am starting one of these. Jenny said they would make a perfect kitty bed, and I am SO taking her up on that. Felix is going to love it.
As always, thanks for stopping by to Blonde & Ambitious. I have some super fun posts coming up next week so be sure to subscribe to my email list so you can stay in the loop!


That’s really pretty! I love it for fall decorating especially!!
I totally agree! It can be customized to be any color you want!
What a fun post! I am definitely not a DIYer but this post gives me hope that I could be! Love the hot pink!
Girl — I am SO not a DIY-er either!! but I think I could definitely do this too!
That is really cute! I can see why your cat would want to claim it for her own.
Right?! Totally 🙂 Thanks for reading Beth!
I love the basket!! I’m not a huge crochet person but I love how it looks!!
It is so fun right?!
I’ve seen this post while scrolling on my fb feed and now I found it again!
I am really obsessed with handmade stuff and even thought pink is not my favourite colour at all, this crochet basket is adorable!
P.S.: I don’t know if it’s me, but the font size is super small and I find it quite difficult to read.
Thanks for your input Christina!! Glad you stopped by!
That’s so cute! I will definitely be trying this!
Yay! So glad you liked it 🙂 Let me know how it turns out!
Cute basket! I hadn’t heard about or seen chunky yarn before this post.
It is SO awesome! I seriously suggest checking it out. 🙂
This is adorable!! You are so so crafty I love it! 🙂
Thanks Lily!! I’m glad you liked it 🙂
Very cute! I want to learn how to crochet…time is not on my side right now so I love seeing what other people come up with! Thanks for sharing!
When you get the time it is perfect hobby! 🙂
This so cool! I’ve never tried crochet before but this seems manageable for a newbie!
It is TOTALLY manageable! 🙂 Way easy and super fun.
OH that is SO cute! Such a fun craft that you can totally use and customize!
La Belle Sirene
I know! It totally is!!!
So cute, this is such a fun and different idea.
I think so too!! 🙂 Jenny did a great job!
What a cute DIY! I’ve never saw one like this!
xoxo
Amy | Pastel N Pink
I’m so glad you liked it!!
Thanks Amy!!!
This is such an adorable basket! I can’t crochet, but it’s always fun to see what other creative people like Jenny are coming up with. Thank you for sharing!
Sockwun | ExtraExtravagant.com
No problem, Sockwun. So glad you enjoyed 🙂
This is absolutely adorable! I love unique DIY projects like this one!
Kayla | kaylablogs.com
Thanks Kayla! I love that you loved it 🙂
This is so neat! I think that bright pink color would be absolutely adorable in a nursery!
xoxo, SS
Southern And Style
I didn’t even think nursery but you are SO right!!! 🙂
Oh this is so beautiful! It would be the perfect pop of color in any room! I may just have to put my DIY fears aside and give it a try!
What a fun idea! I’ll definitely have to try. And that color is to die for! 🙂
Liz
Lizzieinlace.com
What a cool project!! I love that thick yard, too.