Happy #beautymonday, fam! *This is an updated post from a few months ago because I have had a LOT of requests after I put my most recent manicure on my IG stories. I went through and updated with my most current nail routine, and exactly how I get it to last a FULL two weeks!!*
Today, we are going to be talking about DIY gel manicures and showcasing some of my favorite spring mani inspiration! I am obsessed with having my nails done – I HATE bare nails and I love having at least a light pink polish on my fingers. It just helps me look put more together, and I absolutely HATE shooting pictures and filming videos with unpainted nails. It is a pet peeve of mine and I can’t get over it. #sorrynotsorry. I decided a few weeks ago to bite the bullet and figure out how to do them myself because I’ve always wanted to learn how to do pretty nail art, and also I was spending so much money (it’s at least $40 every time when you include a tip) getting my nails done every 2-3 weeks. So here we are. I’ve talked to nail techs, watched countless youtube videos, read many a article on how to do gel nails myself and I’m here to tell you how to do it, too. Let’s jump into this.
How To Do Gel Nails AT HOME – Spring Mani Inspiration!
SHOP THIS POST:


STEP ONE: Purchase your UV or LED light & Gel nail polishes.
I went with a generic UV light from Sally Beauty. It cost about $68. I did not realize at the time of purchase that an LED light actually cures polish faster than UV lights, so I did spend a little bit longer than if I had purchased an LED but the end result is the same and I don’t mind putting on a movie and doing my nails. I also purchased my first round of nail colors from Sally Beauty as well, since they were all right there. They didn’t have as large of a color selection as I would have liked, but I realized you can order a bunch from Amazon, too, so I will be doing that to get some more pretty colors for summer!! At Sally Beauty, nail colors run between $9-$12 a bottle but they are significantly cheaper on Amazon for the same brands.
ORIGINALLY, I purchased Finger Paints Gel Polish for my base coat, top coat and white polish color. I used it for several weeks and I just couldn’t figure out why my polish kept peeling and coming up around the edges after a few days. THEN, I went on Amazon and purchased the Gelish PH balance, foundation base coat and top coat. It made a WORLD of a difference and now my nails don’t peel at all. I honestly think that the PH balance step (it dehydrates your nails so the polish sticks better) made a huge difference. I also purchased Gelish for the light pink shade, and Gelaze for my shimmery gold shade. In addition – I ended up buying a five pack of summer colors from Gellen and they work phenomenally. The Gelish top and base coat are much thinner than the Finger Paints and just look so much more professional. They are more expensive, but honestly, I want my nails to last a full two weeks like they do when I go to a salon so it’s worth it to me. Another brand I REALLY like is the Red Carpet Manicure. You can find it at Ulta and I linked it above. I think that’s my favorite so far – if you are looking for the perfect nude, their shade “Timeless” is phenom!
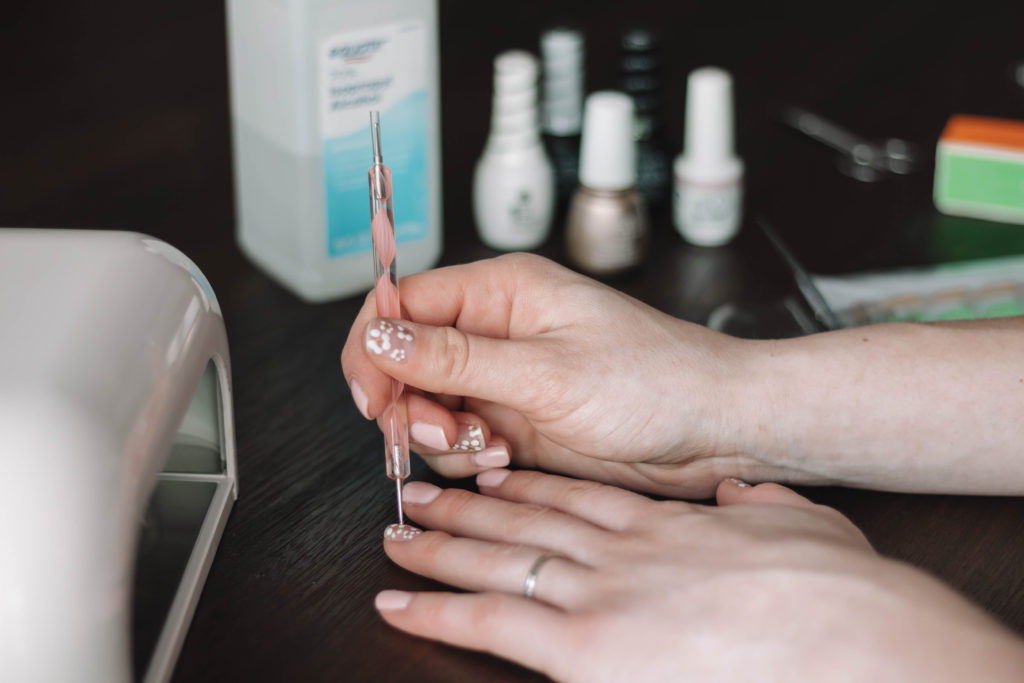
STEP TWO: Buff out your natural nails with a nail cube and file them to your desired shape. Trim any cuticle edges or hang nails. Wash hands.
I LOVE my nail cube!!! It’s really similar to ones they use in the salon, and it’s very easy to use. Mine has 4 different sides: buff, smooth, ridge removal and shine. I start by taking my time on each nail to get them as smooth and shiny as possible so that I have a really slick canvas for the polish. I then file them to the shape I want (I prefer a really natural curve and nails that aren’t too long). After than, I apply a little bit of cuticle cream and trim my cuticles/hang nails so that they are nice and even prior to polish application.


STEP THREE: Swipe fingers with acetone and then apply the PH Balance nail dehydrator.
You have to do these steps in order for your polish to last the FULL two weeks. Your nails have natural oils in them, and oils get transferred when you touch your nails with your fingers, and that all contributes to how long the polish will last on your nails. I couldn’t get my polish to last longer than five days without this nail dehydrator so I think it made all the difference in the world. Plus – you’ll notice they do this step when you are at a salon as well, so there much be something to it.
STEP FOUR: Apply a thin coat of Gelish Base Foundation. Cure TWICE.
This is a very important step. The polish needs the base adhesive to really stick to your nails so they last. The gel polish will just peel up without it. If you have an LED light, you only need to cure for 30 seconds, two times. If you have a UV light, you need to cure for 120 seconds, two times. *for longer lasting nails, you need to cure this step TWICE.* Don’t touch the nails after they come out of the light, because they will be slightly tacky. That is OK – you’ll address that at the end. Leave it for now.
STEP FIVE: Apply two or three thin coats of your polish color. Cure.
Try to make your coats as thin as possible so that your polish doesn’t get too thick during application. Do two thin coats of your polish color and cure (using the same timing method for UV vs LED as above, but only cure one time in between color applications). If you are doing nail art on one or more nails, you can choose to do that now or during step five. I did the white flowers at the same time I did this step and cured at the same time.
READ NEXT: DIY Acrylic Nails – SUPER Easy Tutorial!
STEP SIX: Apply nail art if needed. Cure.
Repeat the step above with your polish color for nail art! do it! I did the white dots and the gold center of the flowers during this step and cured them together in the light. You could do them all separately, but it saves time if you can do some of them together! I also want to note: I swipe my nail art nails with acetone before I put the nail art down on my nail so the surface isn’t tacky before hand. I found that if I didn’t remove the tackiness, the nail polish spread into one another instead of keeping a distinct design.


STEP SIX: Apply a thin coat of Top Coat. Cure TWICE.
This is, of course, the most important part! This sets the entire nail and gives that hard, shiny finish that we’ve come to know and love with gel nails. Don’t get too thick on this because it will significantly thicken the nail layers and it will look chunky (I hate that word). Some people will do two coats of the clear, but I just do one and it works out fine for me. Cure for 120 seconds, twice, just like the base coat.
STEP SEVEN: Swipe a cotton ball covered in acetone over all nails to get rid of the sticky residue.
So, once you pull your nails out of the light, you may be tempted to touch them. If you do this, you may panic because they are still slightly tacky. But as long as you’ve left them in the light for the right amount of time, this is normal. Once you apply your top coat and cure it for the right amount of time, take a cotton ball or cotton pad covered in acetone and vigorously rub it over each nail. This kind of completes the “setting” of the nail and gets rid of that sticky residue that you may be stressed about. I panicked the first time I did my nails and tried to use the acetone in between each layer, but you don’t have to do that. It’s super unnecessary. Just wait until the end!
STEP EIGHT: Wash hands and enjoy your beautiful new nails!
I know I have a long way to go before I am some master gel nail wiz BUT I feel like for the first time, this isn’t all that bad. The polish lasted a long time (almost the full two weeks) before I removed it and wanted to do something new! Make sure you wash your hands thoroughly after you finish painting them and then go rock those pretty new fingernails!
STEP NINE: REMOVAL!
This is an update to this original post: Removal!! So, when it comes to removal my favorite way to do this is to buy these gel removal pads from Amazon. They work perfectly when you drop a little bit of acetone on the pads. Start by putting Aquafor all around your cuticles and nail bed to keep them from being dried out from the acetone. Then, using a buffer or nail file to scratch the top of the gel so that the acetone can really soak in. Wrap your nails in the foil and let sit for 15 minutes. Once the time is up, use a cuticle pusher to gentle scrape off the gel polish from your nails. Wash your hands thoroughly once the gel is removed and enjoy your clean nails – and don’t forget to MOISTURIZE afterwards.

PIN THIS FOR LATER:

I hope this helps you achieve the nail look of your dreams! It definitely takes practice – and it won’t completely replace going to the nail salon for me. It’s an experience for sure, and I love doing it with my mom and sister. Especially pedicures. BUT – since I do like my nails done so often, it’s a cost effective way to make sure that happens and doesn’t break the bank. It’s a bit of an investment upfront, but within the first three times of doing my nails, it’s made it’s money back. PLUS, it’s become kind of therapeutic for me and I really look forward to doing it every few weeks now.
Do you do your own gel nails at home? Any tips for beginnings? Let me know in the comments below!


Yes girl YES. I absolutely adore my gel manis at home. My mom got me a UV light a couple years ago for Christmas, and then she loved it so much that I got HER one for this past Christmas. Then my sister loved it so much she got her best friend one. And my best friend loved one so much she got one too! They’re addictive haha!
Oh my gosh! These nails are so cute, I love that you did this at home! I don’t have my own UV/LED light but I’ll definitely have to keep this in mind for when I want to dabble in at home gel manicures.
This is so awesome babe! Would be so fun for a girls night or a self care day!
Kileen
cute & little
I normally don’t get gel nail polish. I prefer to use dip powder. But spending $40-50 every 2 weeks is getting a bit expensive lol I need to learn how to do it on my own.
This is such a great tutorial! I love gel manicures and need to try this!
Girl, if I were coordinated with a nail polish brush like you, I’d do my own gel manicure! Every time I do my own nails, they come out looking like a Pinterest Fail!
It looks so good! I always have to go get my nails done at the salon! I’m no where near this good!
I wish I could do my own nails as well as you can! This is so great!
What’s the difference between curing twice for 30 seconds vs once for 60 seconds (in the case of a LED lamp)? Found this blog really helpful!